One Good Lookin Pup

As you may have already figured out, our puppy Fitzgerald is spoiled. Like REALLY spoiled.  His toys are scattered all over the house and the boy gets treats like they're going out of style. But how can you resist his adorable-ness?


Mr. B isn't a huge fan of pups in clothes, so I figured out a different way to make Fitzgerald look classy and put together all of the time - bow ties.  Plus, doesn't a dog with a name like Fitzgerald NEED a bow tie?  I think so!

When we first got Fitz, I found a bow tie for him at Target (you know, during one of my "I need milk, and oh, also a bow tie for my puppy" runs).  It is completely adorable and was actually pretty reasonable - I think it ran about $4.00.  I slipped it on Fitz' collar when I got home and he has been stylin ever since.

After a run in with a mud puddle and some other dogs, the bow tie needed to be washed badly.  As I was washing it, I realized that the way it is put together is actually very simple, and I decided to make some myself. Then Fitz could have a bow tie for every occasion! Yay!

Here's how I made Mr. Fitzgerald a very fashion-forward orange bow tie...

Supplies:


Fabric (duck cloth or something a little thicker holds up better, but you can make anything work!)
Measuring Tape
Felt
Elastic
Sewing machine (optional)
Scissors
Needle and thread
Hot glue gun

Start by cutting 2 rectangles of fabric for the main part of the bow tie.  I cut mine to 8 inches wide and 4 inches tall, and the smaller one to 2 inches wide by 4 inches tall.  These dimensions will give you a bow tie that is about 4 inches wide and 1.5 inches tall.  You can increase or decrease the dimensions to result in a larger or smaller bow tie as well!  You can set the smaller rectangle to the side, as we will work with that one later on.


Next, fold your piece of fabric in half with the right sides together.  Sew a straight line down the edge of the fabric to secure the 2 sides together and make a tube.  I used a seam allowance of about 1/4 inch, but it doesn't have to be precise (or even pretty!)  You could also do this by hand if you don't have a machine.


Then pull the fabric from one end through the tube to turn it right side out.


That's the base of your bow tie!  At this point, you can iron the tube flat to get crisp seams if you want (I'm lazy so I'm skipping that step, but it can help to make the next part a bit easier)

Take your tube and lay it flat on the table.  Fold one end in just past the middle point of the tube.  Repeat with the other end so that the two ends are overlapping in the middle of the tube by about 1/4 to 1/2 inch.  Pin through all layers, and then sew straight down the middle to secure the ends together.


Grab your smaller rectangle and repeat the steps to turn it into a tube, and then turn it right-side out.  This piece will be the middle part of your bow tie.

Here's where your bow tie will start to come together!

Cut a small piece of thread, and wrap it around the middle of the bowtie.  Pull tight, and then tie another knot so that the tie is gathered in the center.


Take your smaller tube for the center of the bow tie and lay it flat on the table, seam up. Put a large bead of hot glue in the middle and then stick your bow tie piece face down and push hard to secure (make sure you double check that the bow tie is facing the correct way!)


Then take your glue gun and put a large bead of glue in the middle of the back of the bowtie and pull one side of the middle section tightly around the center of the tie and push down to secure.  Repeat with the other end of the fabric


Yay! It's a bow tie now!!  Feel free to gloat about how awesome it looks to whomever is around.


All that's left is to add the elastic to the back that secures the bow tie to your pup's collar.  Start by cutting a small square out of felt.  Mine was 3/4 inches square.


Cut a piece of elastic to 2 inches long, and glue one end of it to the piece of felt.  Then wrap the elastic around and secure the other side to the felt.  (If you made your bowtie bigger or smaller than my dimensions, you may want to adjust the size of the elastic to correspond.  It should stretch enough to get around the collar, but not be too loose)


The last step is here!  Secure the elastic piece to the back of the bowtie with a nice large blob of hot glue.  Make sure that you secure it so that the elastic gets glued between the felt and the fabric.  That will help keep it extra tight and secure.


And that's it!!! Here's a picture of Mr. Fitz sporting his:


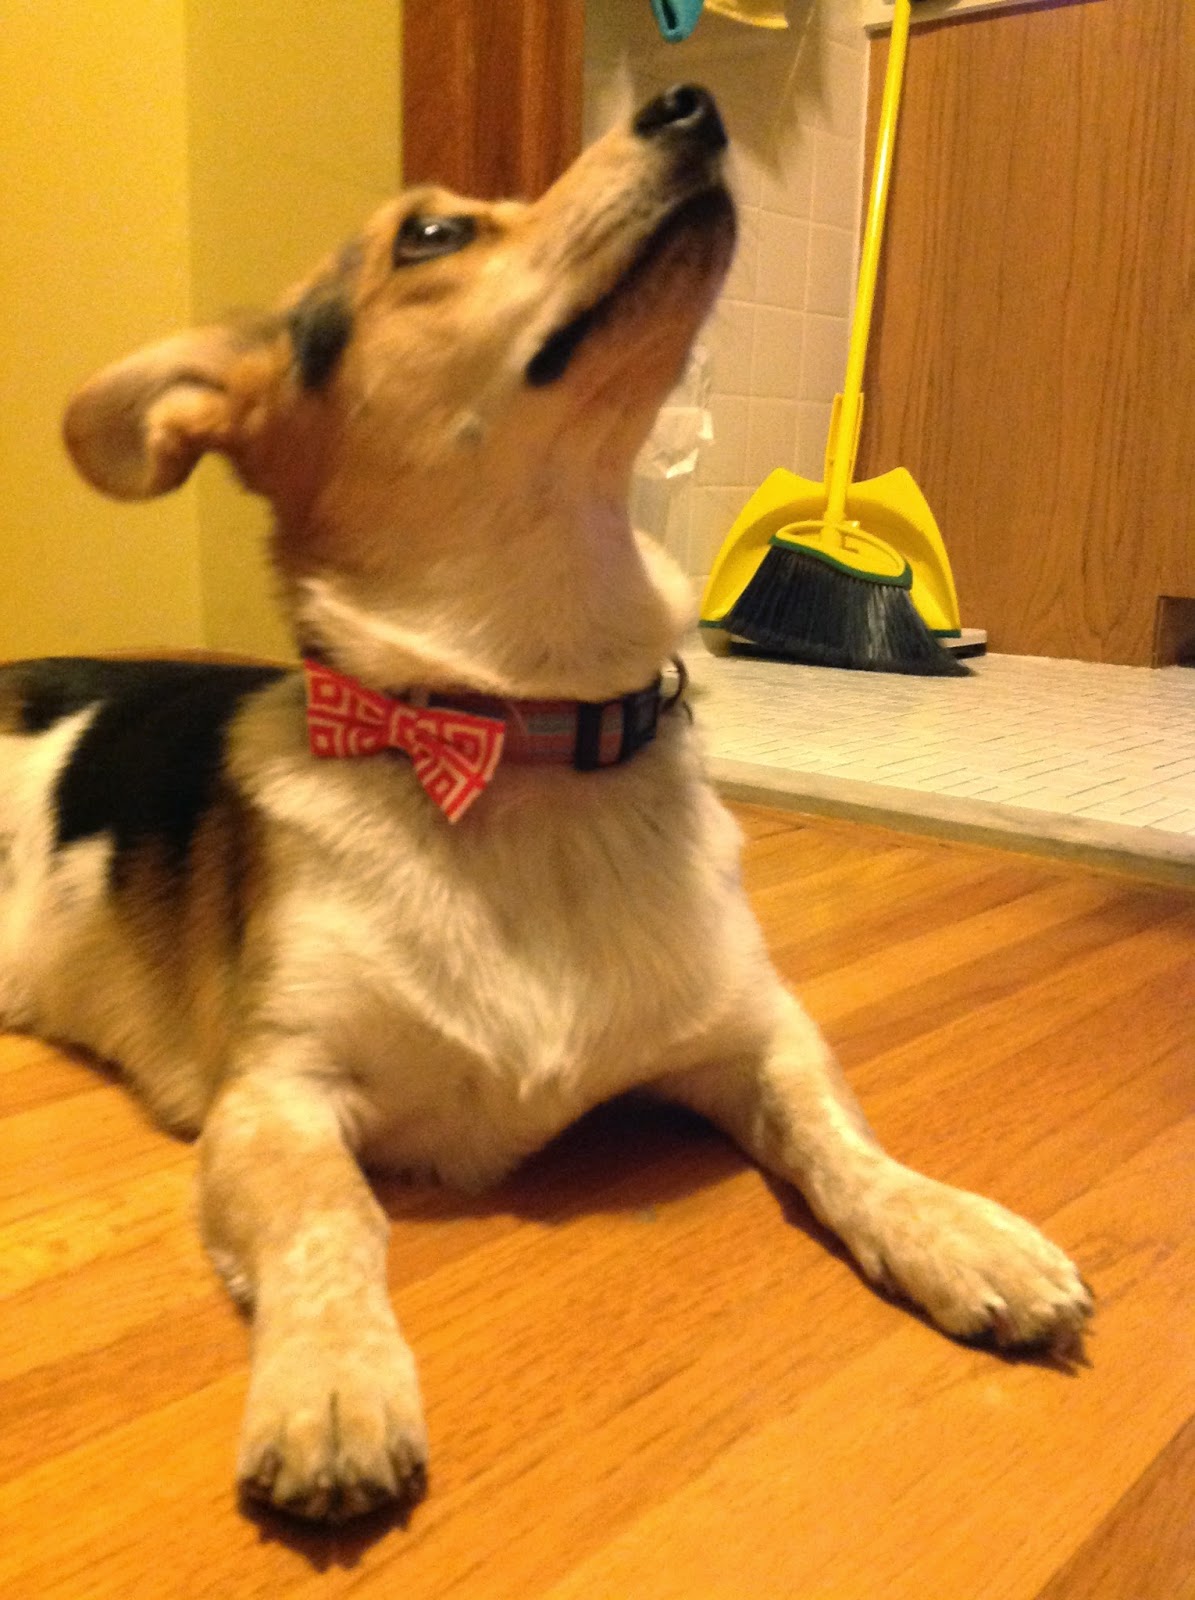
(Feel free to ignore the horrible composition of that photo, though!)

I hope you enjoyed my first whack at a tutorial.  Feel free to leave a comment or feedback about it so that I can continue to make them better as I add more!


Linking up @:
- Hope Studios
The Makers Link Party
- Snap Creativity
- Lamberts Lately

The Weekly Frills - 7.25.14

On Fridays I share a few things that have caught my attention, inspired me or made me swoon during the week.  Here are the frills for this Friday!

________________________________________________________________________


Wayfair.com


Have you ever heard of or been to Wayfair?  Their motto is "A zillion things home."  So essentially an Amanda's paradise.

I've been in a lighting mood recently, so I have been spending time looking at different options.  Wayfair has a ton, and most of the ones I have seen are a really good deal.  

I'm sure it won't be long until they have some of my money...  

Here are a few things I'm digging from Wayfair!


(Can you tell I want to hold on to summer a little bit longer!?!?)

_____________________________________________________________________

Marquee Numbers

Right now marquee numbers (those big, light up numbers from vintage stores/signs/etc.) are ALL the rage.  And rightfully so!  I stumbled upon a great tutorial on how to transform paper mache numbers into knock-off marquee numbers.  It's from a blog called The House of Wood.  After I found the tutorial I spent an hour a reasonable amount of time reading her posts and adding more tutorials to my list of to-dos.  Here's a pic of the marquee letters...I'm in LOVE!


________________________________________________________________________

Short list this week...all of that painting (both successful and unsuccessful!) took a lot out of me :) I'll be back next week with painting updates and another freebie!!


Have a fantastic weekend!


Truthiness: Stencil Edition

Truthiness is one of my favorite words.  And I don't use it nearly enough.  I'm sure my friend Stephen Colbert is disappointed that it is not a more regular part of my vocabulary (Me and Steve - we're totally BFFs)

But BOY do I need to use it today... Sit back as I regale you with the story of Amanda vs. Stencil.

I'll start with this...


THAT is where 2 hours of work, a trip to find a new stencil brush (or 4) and half a roll of paper towels got me. A blank white wall.  A whole lotta nothin.  I'll explain in a minute.

Whoof.  I knew it was going to be hard work, but guuuuurrrrrrllll (and guy too), it's WAY harder than I thought.  Like pull-my-hair-out hard.

My perfectionist side had a meltdown yesterday as I pulled the first stencil off and saw the fuzzy edges and drips of paint on some of the herringbones (I don't think that's a word, but go with it for me!)

Then my practical side kicked in and I thought, "Hey, it's actually not too bad for a first try!"

But eventually, Ms. Perfectionist won the battle.  I went to bed disappointed in my work and a tad bit totally ready to call it quits.

7 hours later, my tune had changed. It's amazing what a night of sleep can do for me (no matter how restless or low-blood-sugar-filled).  As I was walking in to work this morning, I just decided I'm going to make it work.  Fuzzy edges ain't gonna get me down!   Yes, it's probably going to take me a week or more to get it done with an hour here and there.  But I DO love how it looks already, and I know once it's done I will be happy I did it.

When I got home, I looked at the work I HAD done yesterday and decided it wasn't a good place to start.  So, I went back to a blank slate and painted over what I will now refer to as the "stencil test run."

If you come to my house and it's not done, don't be surprised.  you come and it IS done, better believe you're going to be getting an art museum-esque tour of that wall in all of it's glory.

I imagine it will be one of those projects that I work on here and there until it's done.  After all, there's no real rush.  And I don't want to take the joy out of the process either!  Because when I sat down today and tried again, I truly enjoyed myself.

And here is what I ended up with:


Is it perfect? No. There is still some bleeding and spots that I will have to touch up.  But that's cool with me.


So there - that's my truthiness.  And I'm stickin to it.

PS...apologies for the poor photo quality...late night painting and those darn boob lights makes picture taking difficult!


Paint Project, Post 1

If you happen to follow me on Instagram, then you saw the pile of paint cans and containers that was my project this weekend.

Not that the project is done. Hahahaha you guys thought it was done, didn't you? 

The laughing was aimed at myself - I rarely can complete a project in just one weekend!  What fun would that be?!? In fact, currently there is a large easel sitting in my living room. Why, you might ask? I imagine a conversation about it's presence might go something like this: 


You: "That's a nice easel you've got there - is it a statement piece for your living room decor?"

Me: "No, silly, i'm just working on a project, and I like to work here where I can be around Mr. B and Fitz and whomever else is here."

You: "Ok, that makes sense.  But wasn't it here four months ago too?"

Me: "Ummmm...well...maybe...have you seen the new paint color in the craft room  spare bedroom?" 

You: "Wait, you have a spare bedroom? Couldn't the easel go there? (implying that that might be a better location than the middle of the living room)"

Me: (completely ignoring your last comment) "Come on, I'll show you how awesome the new grey color looks!"


Anyway, I thought I would share a few pictures of the paint progress and then let you in on how I plan to finish the room!

Here is a picture of the room before:


And here's a *VERY MESSY* picture of it after.  


If you feel like your eyes are deceiving you, you're not imaging things.  Most of the walls are grey, but the one in this picture and another small wall near the door (that you can't see) are actually white. That's because the white ones will be getting a stencil treatment soon!  Yay for lots of color!  And the grey is already SO much more "Me!"

I took the plunge and bought that herringbone stencil I mentioned a few weeks back...and boy, am I excited to get it!  It's from Royal Design Studio.  Totally thinking I'm going to be addicted to stenciling once I get my hands on this one.  And did I mention it's Herringbone!?!?!? Ahhhh!!!!

So, that's what my weekend entailed.  As soon as I get that stencil in my hands, that's what I'll be plugging away on after work this week too!  And you can check out instagram for a peek at the colors I'll be using to stencil!!


The Weekly Frills! 7.18.2014

On Fridays I share a few things that have caught my attention or inspired me during the week.  Here are the frills for this Friday!

________________________________________________________________________


An Awesome DIY Tutorial


Remember this light from a few weeks back in my post about plans?


I'm totally in love with the architectural, vintage feel of this light.  The geometric lines make my heart sing, and I can see it in our hallway, my craft room or even the bedroom.  

Then this week, I saw a tutorial on one of the blogs I follow, Vintage Revivals.  The author, Mandi, has a super cool style and does all sorts of sweet DIY tutorials that I dream about following.  The tutorial that reminded me of this light was for a hanging plant holder.  


Now, plant holders aren't really my style (I have a BLACK thumb...plants cringe in fear when I pass them). BUT, the method of assembly and awesome shape reminded me of the lights I drool over.  I'm thinking about trying to use the tutorial to make my own geometric light fixture for my craft room.  A little ambitious? Definitely.  But I'm feeling like I could make it work, and then I could paint it whatever color I want and make the size fit perfectly for the room!

________________________________________________________________________

Curb Appeal!

One of the other things on my to-do list is give our house's front entry a little extra curb appeal.  First thing I'm going to do is get some new house numbers and make a little plaque to put them on.  I'm totally digging these numbers...


They're more modern, nice and dark so they're easy to see from the street, and they'll be a nice contrast to the wood plaque I'm imagining.  I'll share a tutorial of making the plaque once it's done and installed!

________________________________________________________________________


First, how can you NOT like a blog with a name like Tatertots and Jello?  I know I can't!

But don't be fooled - I'm not just enthralled with the name.  The content of the blog is as inspiring as it's name is adorable. Jen (the blog owner) has an awesome eye for design and features tons of different tutorials at lots of difficulty levels.  I can always find an idea that gets added to my "Must Make This!" list!

Check it out!


That's all for now, folks. 

Actually, there's one more thing...

How about another printable?  Here is the next printable in my "inspiring dots" series!

Love Deeply.


Have a fantastic weekend!

Bloglovin!

Follow my blog with Bloglovin

Now you can follow my blog @ Bloglovin!  It's a great tool to keep an eye on those blogs you like to stalk...my list gets longer every day!


Back to reality...and a new freebie series!

Well, today meant back to work after our mini vacation...I think that sad fact deserves a moment of silence.

.............

Ok, enough pouting.

Every now and then Mr. B and I talk about how it feels like we get in these loops of "sameness." Wake up, Walk the Pup, Work, Home, Chores, Errands, Sleep, Repeat.  I'm sure everyone knows that story.  We needed a little excitement in our lives!

Vacations are always exciting!  But of course, there's always the issue of FUNDING said vacation. Since we're trying to save for another tropical vacation in the *relatively* near future, we decided on taking a little mini vacation up north to Lake Superior and the beautiful wilderness it holds.

So last Wednesday, Mr. B, Fitzgerald the pooch and I headed to the North Shore of Lake Superior for some time away.  We hiked lots, saw Gooseberry Falls, visited Grand Marais and even squeezed a little time in to enjoy the outdoor heated hot tub at the resort!  It was a perfect break from the crazy work schedule of Mr. B and the normal day-to-day hubbub that can get to a person!

Here's a peek at the whole fam enjoying a hike!


A lack of reliable wifi meant that I didn't get my Weekly Frills posted on Friday...bad Amanda!

But maybe this will help make up for that slip of mine...

A few weeks back I whipped up a series of printables using some simple life-sayings, color and texture. Though I haven't decided where I'm going to put them in MY house, I have decided that I should share them! Here's the first one in the set...there will be more to come down the road! Enjoy :)


Oh, so many plans...

I believe that I have explained before how I have SO MANY IDEAS.  Like TONS.  Like enough-to-fill-the-Atlantic-Ocean-and-still-have-some-left-for-a-nice-salt-water-pool-in-the-backyard enough.  I have plans for our house, for vacations, parties, our lives and our imaginary (but hopefully relatively soon to exist) children.

So I thought I would share a few of the things on my "House" list that I want to tackle soon.  Soon being a relative word, of course.  Most are small changes that I can complete on my own and at my own pace. I DO have to remind myself that nothing has to be done right now.  It's just so hard to wait!  But I'll slowly cross one thing off of the list at a time (while adding twice as many to the list, i'm sure!)


***DISCLAIMER - this post will include pictures of our home in all its unfinished, mismatched and messy glory.  I've got work to do in every room, so it won't be pretty! Here goes nothing!


Paint my office/craft/guest room


Right now it's a soft yellow.  Not horrible, but not really my style either.  Unfortunately the living room and tiny hallway are also the same color, but they're larger projects and will have to wait a while. 


I'm contemplating a soft grey/beige (what up, greige!) and an accent wall with a pattern.  Possibly that herringbone stencil that I mentioned last week!  I'm not lucky enough to have the beautiful white trim that I dream of, so I'm figuring out how to work with the honey oak trim that we've got.  Right now this is the color combo i'm digging:


Remove the "lovely" wallpaper and border in the kitchen


In this case "lovely" actually means outdated, ugly and just...yuck.  I've never been a wallpaper or border person, and this one is no exception.  Having never removed wallpaper before, I'm a little nervous to get started.  Let me know if you have any tips/tricks/tutorials that you recommend...I'm all ears!


Replace the horrid "boob" lights in the hallway and bedrooms


I hate these light fixtures.  With a passion.  In fact, when they finally come down, I may do a ceremonial smashing of one just to spite it.  Don't worry, one is actually broken, so that's the one I'll smash.  The others will be promptly donated to our local Habitat for Humanity Re-Store!

I have a couple of ideas for different rooms:


Hallway: 


Bedroom:


Craft/Extra Bedroom:


Give our house a little more Curb Appeal


Our house isn't ugly, but it's all one color and kind of plain looking from the front.  It needs some frills!  I would like to create a little wood plaque that I can add new house numbers to to give it a little more charm.  Oh, and I HAVE to fix the ugly, peeling stairs.  Not sure how to do that, though.


I'm also digging the idea of painting the front door.  I'm just having trouble deciding on a color.  I would love to do teal, but since the house is tan I don't think that's quite right.  Maybe Orange or Navy Blue?!? Opinions are welcome!


Hope you have a great hump day and remainder of the week!  Mr. B and I are heading to the North Shore today for a few days of rest and relaxation, so I'll see you on the flip side!


The Weekly Frills! 7.4.2014

Happy Independence Day!  I hope your day is full of food, family and friends, and lots of fun! My frills for the week are ready for you to see! Enjoy :)

________________________________________________________________________


Design Seeds


I am a color-lover.  Those paint chips you get at Home Depot? Yeah, I don't usually leave the store without at least a few of them in my bag.  I've got stacks of them at home!  When I found Design Seeds, I was totally hooked!  It's a fantastic website that bases color combinations off of beautiful pictures.  You can search by color or theme, or just browse them all like I usually do!  It's great :)


________________________________________________________________________

Words


I have a pinterest board where I like to pin quotes/words that inspire me. Words are so powerful - that's why I love to use them in decor.  They can be both impactful AND beautiful at the same time.  In fact, I feel a few printables coming on...they'll go in my craft room, and I think I'll share them here too!

________________________________________________________________________

Herringbone EVERYTHING


I cannot get enough of herringbone patterned things! No matter where I am shopping, internet-surfing, or blog-stalking, I am immediately attracted to the geometric lines and arrow-incorporation of herringbone!  Below are a few things I've found (products and tutorials) that I might use for inspiration in our home!  Mr. B will probably be sick of herringbone soon...lol